Nellie"s Needles
Showing posts with label Ortwork Collage. Show all posts

Tuesday, January 07, 2014

Last Year's Creations


I have been quiet here in blogland this last year. One of the main reasons is that most of my online time is spent on an iPad ... which is not at all conducive to posting here. It's been easier for me to post a quick picture with a brief message on Facebook when a project was finished. Also, I haven't been all that productive in my studio(s). My energy has been a bit diminished since surgery a year ago August and what I do have has been directed to time and activities with family and friends and keeping up with two households.

In review, here are the pieces I have completed this past year ...
 "Smoky Mountain Sunrise" 20"x 16"

It won 3rd place in the Art Quilt category of the 2013 Smoky Mountain Guild Quilt show . To see the beginnings of this piece as well as others that present variations of my favorite view in the Smokies go here. It is for sale at the Cliff Dweller's Gallery in Gatlinberg, Tennessee.


 "Unraveled VII" 24"x 40"


The making of it can be read in the posts of February last year. This, too, was an award winning quilt in the SMG Quilt Show last spring. It is hanging in its new home in Memphis, Tennessee.


 "Trillium Patch" 18"x 18"

This is the first of the wildflower series wall quilts. It found a home in northern Indiana.


Trillium Patch #2 (16"x 13")

Trillium Patch #3 (16"x 13")

The two above are for sale at the Cliffdwellers Gallery up in the mountains.


Trillium Patch #4 (16"x 13")


 Trillium Patch #5 (16"x 13")
The two above are the ones that got pieces of real birch bark along with leaf skeletons included. They are available for purchase at Good Goods Gallery in Saugatuck, Michigan. The making of all the wild flower pieces can be read about here.

 "Moon Set on the Lake" (21"x 17")

This is part of the 100 lake series. I'm sure my goal of a hundred has been reached... I've lost count. However, I'm not finished with making lake pieces. There are definitely more moon set ones in my future. This one was sold to a Michigander.

There was quite a bit of creative time spent this fall playing with glass.  I'll post about that big project in the near future.
 
I'm looking forward to being more productive this next year. I've already got a start on that by participating in an online group endeavor. More about that in my next post.

PS: Add the cuddle quilt "Boxes of Color" that was written about in the last post) to this list of accomplishments for 2013.

Monday, May 06, 2013

Different Kind of Orts

When I was at the Cliff Dwellers Gallery Theresa Tyler was stripping birch bark to make hand crafted baskets in her studio space. While we were talking she was discarding that outer papery white layer.  Before I left I asked if I could glean her waste basket of what I considered to be the "good stuff." This is what I brought home.

You'll note there's also some marbled paper scraps strewn among the bark pieces. Pat Thomas, another of the gallery co-op owners, does marbling. I emptied her wastebasket of those. The pieces with blues are now stashed with the bags of orts set aside to make lake pieces.

The two new trillium pieces have "birch sticks" in the foreground. Here's one of them with the first layer of orts trapped under yellow tulle ready to be quilted.
"Trillium Patch #4"

Sunday, May 05, 2013

More Trillium Patches

I've become enamored! There are two more trillium textile art quilts that I finished and delivered to the Cliff Dwellers Gallery in Gatlinburg this past weekend.
 Trillium Patch #2

 Trillium Patch #3

Both of these began with my dividing one of the pieces of fabric on which I had made rubbings of huge leaves that were collected along the Mississippi River with gold and silver oil paint sticks back in 2008.

Here are both of them with the first layer of bits and pieces of scrap fabrics, thread ravels, roving, and skeleton leaves
... before they were trapped with a layer of yellow tulle netting. I then machine quilted around the outside edges as well as the shapes and lines.

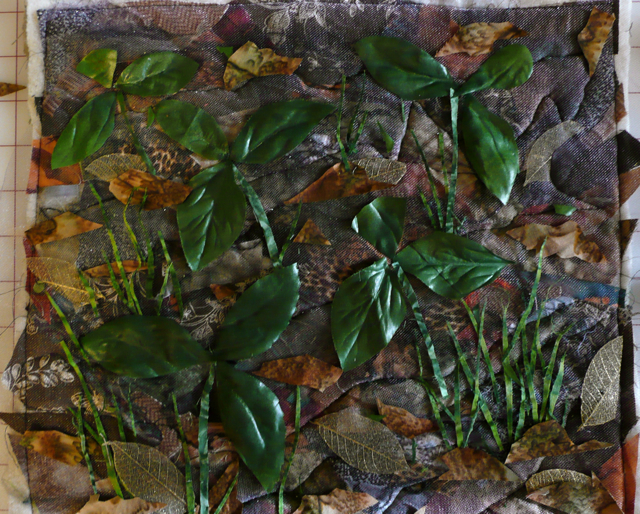
Here you can see I've added leaves, stems, and grasses that were shaped from fabric scraps and disassembled "silk flowers" (collected from thrift shops) to the quilted foundation piece on the right in the picture above.
The next step was to trap those pieces with green tulle by quilting around their shapes. The excess tulle was trimmed away between the leaves so as not to "muddy" the background.
The border fabric is linen that I discharged a number of years ago. Real fern fronds were scattered across it and then a strong bleach solution was spritzed over all. The bleaching action was stopped by immersing the fabric in a bucket of vinegar and water. At that time I discharged all the yardage I had of this linen with various patterns, some of which was used in "Come With Me to Kasbah" and "Fading Memories". I love the copper color of the bleached areas. I had gone back to the store to purchase more, but it was GONE.

The first hanging, "Trillium Patch #1" sold before it was finished to one of my blogging friends. There are two more foundations using another of those pounded big leaf fabrics layered and laid out to make numbers 4 & 5.

Wednesday, May 01, 2013

Happy May Day!

 "Trillium Patch" 18"x 18"

It's finished except for the hand-stitching of sleeves and pockets for the hanging apparatus. I like the contrast of the dry ashy colors in the border with the warm ones in the coming to life area. The contrast of scale between the border print and the trillium patch, as well as the contrast of the clean edge on the outside versus the fuzzy organic around the focal piece pleases me, too.

Thursday, April 25, 2013

Trillium

I'm liking this piece a lot!
However there were moments I considered scrapping it ... which means eventually cutting the woodland floor background into pieces for something else. My problem was that every color of tulle I placed over it to hold the sprouting plants in place "killed" the woodland floor hues. The whole piece just "died."

The solution was to choose the tulle color that enhanced the new growth parts ... that one is the bright yellowish green one...
It was pinned to cover the whole top. I stitched/quilted around the greenery then trimmed the tulle away from the woodland floor sections.
Well, most of it. I see that some more needs to be cut away. Do you see how the color is lost in the upper left corner in the above photo? Think I'll be trimming that away. Pieces of white tulle were placed over the blossoms, then the excess trimmed away after free-motion stitching around the petals. That stitching also anchors the calyx pieces which are loose on the surface. Some new growth pieces float on the surface as well.

Now I'm really excited about this piece. Next the yellow stamen will get embroidered and I have an idea about framing to pursue.

Wednesday, April 24, 2013

Sprouts on the Woodland Floor

I very much liked the foundation of scraps for this wild flower piece.


I have a lot of colors of tulle to select one to hold all these bits and pieces together ... and I debuted them all.


The grayed lavender is the one that worked best to my eye.
I quilted around the outside edges and just enough organic style lines through the center area to keep all those bits in place. Then I added newly sprouted plants along with real leaf skeletons and more scraps of fabric.

I have a huge bag of silk plant leaves. I kept digging until I found ones with the right hue, sheen, and veining. Very rarely do I use any "whole" leaves. You can see where one of the leaves for my plants was cut from that large one on the right.

Can you guess what the flowers will be from my leaf formations?


Monday, April 22, 2013

A Bit of Earth

I've had in mind for sometime to create small art quilts featuring spring flowers. A week ago after a picnic I took photos on a trail walk along the Clinch River ...


The coming of spring here in east Tennessee has been late. There were no new leaves on the trees and just a few sprouts of early wild plants.

Yesterday afternoon I got a start on creating the foundation for the first quilt. On the left is the first step of covering the batting with pieces from my scrap bag ... I think of it as "under painting"...


A second layer of thread and yarn scraps, plus scraps of tulle netting have been added. Now to do just enough quilting to hold it together, then I'll continue to build the picture. I still haven't decided which flowers will be growing through my woodland bed.

Just a reminder about the contest at the Quilting Gallery. Go here if you haven't yet checked it out.  Voting for 4 favorite quilts from the 37 entries and entering the fat quarter give-away deadline is 6:00 p.m. (EDT). Have fun and good luck!

Thursday, November 08, 2012

Lavender Haze

The previous post showed only a portion of the lake piece. Here's the whole before the layer of tulle was added ...

The pink tulle lessened the contrast of the colors and contributed a "haze" over it all ...
"Lavender Haze" (31"x 32") #85

There's also a bit of iridescent paint, water color pencil and oil stick pastel work to highlight some areas, as well as to blend others into the background. I do that after much study of the piece hanging on my design wall. I go slow with these additions so the major element of fabric is not overwhelmed ... so it doesn't lose its identity as textile art.

... and a close-up of the beach grass in the foreground ...

It was free-motion machine quilted with this variegated thread...


Next up is a presentation of the final eight that will be the Smoky Mountain Quilt Guild's entry to the Guild Challenge in next summer's AQS show in Grand Rapids, Michigan.


Saturday, November 03, 2012

Red Violet Challenge

As a member of the Smoky Mountain Quilt Guild, I took on the challenge contest for 2013 ... blindly choosing a spool of thread, then using that thread color to create a monochromatic quilt. This is mine ...
I sorted through several huge bags of scraps for bits and pieces of fabric and thread and yarn that related to red-violet to create a lake scene ...

I suspect the intention is for us to use all the different values of one color ... the addition of black and white to make lighter and darker hues. I've also included the muted shades of red-violet ... those hues made by adding gray or the complementary color. It will be interesting to see if my piece qualifies.

The reveal is at the November guild meeting this next Tuesday evening. After that I'll post a photo of the finished quilt (the above picture is the first step of laying out a foundation layer in my collage process). Now I need to get back to finishing the construction of the back. Interestingly, the art part is all machine work while the backing and hanging parts are mostly handwork.

Thursday, May 10, 2012

A Tropical Garden - the Beginning

The foundation for a new piece featuring a garden of tropical flowers was created yesterday. As usual, it's made up of recycled materials in the technique I call "ortwork". Scraps of silk sari fabric samples are arranged over an old woolen blanket with a piece of someones excess upholstery fabric as the backing.
Laying the silk pieces was like working a puzzle to cover the whole surface. Then I got out a container of thread and yarn ends/tangles to add a vertical element to it. Camouflage printed netting was layered over it all, then sparsely quilted to create a shadowy depth for the upcoming garden of flowers.
I couldn't resist playing a bit with various hues of tulle and a few flowers over that background piece on the design wall before packing up all the materials. Building layers to make a lush garden of tropical flowers on this piece will be done in Michigan.