Nellie"s Needles

Wednesday, December 31, 2008

Happy New Year!

Here's to cyber friendships! Thanks to all who have left comments and sent emails in response to mine and to all who have "played" with me through exchanges, gifts, and round robins. Cheers!

PS: The fireworks is a photo of the center of the quilt, "Celebration". It was part of The Smoky Mountain Quilters submission that won the Grand Champion award in the Ultimate Challenge contest at the 2005 American Quilter's Society Show in Nashville, Tennessee. It can be seen in its entirety here along with the other seven that were submitted with it.

Monday, December 29, 2008

Time Pieces

This past summer a friend gave me two old pocket watches. I tried to talk her into keeping them, but she'd rather I took them apart and use their workings as opposed to their continuing to take up drawer space. Sooooooo......
once I located a set of screw drivers small enough to do the job, I did. In addition I rounded up all the watches taking up drawer space in my own house to make these pins as gifts.
It astounded me that the pocket watch innards were engraved with wonderful patterns. And then there were all those fun little wheels and sprockets and "stuff".
I titled all but one of the pins "Time Piece". The foundation for each is hand dyed wool with fabric pieces (made as leaves for my mountain series) and wool roving felted into it with a felting needle.
The watch parts were stitched onto the adorned wool fabric. Then a piece of fabric stiffener cut smaller than the wool was layered between it and a backing fabric that is just black cotton. Both layers were sewn through while I attached the variegated yarn trim. A jewelry backing pin is stitched onto the back side.
I fell in love with the assortment of tiny screws. I ended up encasing them in a watch housing case with the face of a once favorite watch. It's titled "Loose Screws" and it was most tempting to keep this one for myself.
However, I could not stop thinking of my cyber friend, Paula (Self-taught Artist blog) all the while. She's the one who's creating the 100 art clock series which was the motivation for my 100 quilted lake pieces. This pin is now where it belongs ... in her possession.

I introduced my older son to Paula's clocks on her website. He was greatly intrigued and purchased two ... one as a house gift for his best friend who's a train buff and this one that hangs in his own kitchen.
I'm spending the holiday's in the kitchen with this clock and think of Paula when I check the time. So, if her ears are ringing ......

PS: I made a Christmas ornament out of the casing of the big Elgin pocket watch for my friend's tree. Instead of clockworks inside, it's filled with an antique brass filigree piece that looks like a snowflake.

Sunday, December 28, 2008

Exquisite Corpse Round 2 - Sun Mask

My Exquisite Corpse completed its rounds quite awhile before the deadline of December 20th. When it arrived I hadn't even opened Carol's. My work space was piled high with elfish duties of making and wrapping presents. I cleared a space, filled in the last section on Carol's corpse, packed hers up, and then excitedly tore into my package to reveal this piece of fabulousness.
Each talented corpse mistress in my group completed a section without having a clue to what was previously done. So those resulting alternate patterns of warm and cool hues amazes me.

The way this interesting round robin project of international scope worked is that a basic design was created by each of the six participants in three groups. I was in group two.I transferred mine to a background cloth and divided it into six sections and worked the first one. It is hand appliqued using a freezer paper method. Meaning each piece was transferred to and then cut out of the FP with an added narrow seam allowance which was then turned under before each paper covered shape was blind stitched into place on my chosen background fabric. I completely covered every bit of my worked section and sent it out into the world.
Included was a note to use full-strength colors ... meaning no pastels, nor muted tones. I also stated my preference that the piece be quilted after it returns to me. I requested that each name be written on the fabric covering a worked section (those have since been pieced together as the backing).

Carol in Wales was the first to get it. I'm sure she figured out that the section she chose was the other half of a face. The pink area is hand-dyed cheese cloth while the blue is machine felting. And then there is painted tyvec and newsprint as well as beads.
It was then sent onto Nancy in Canada who filled the bottom right section with wild colors and pieced it together with lots of texture.
Betty in Alabama was the last one to work on it and hand appliqued silks and crystalline fabric in the bottom left section. Her points could not be any sharper and the scattered beads sparkle on that rich, deep, shining blue.

In the meantime, Anne Marie of Canada was the third corpse mistress to add her talent to the upper right section. She suspected my design was a variation of a NY Beauty. She was a little surprised by that after checking out my blog and not seeing much traditional work. So she decided that my "traditional" block wasn't going to be very traditional, if she had anything to say about it. She even included orange snake skin pleather on the point pieces.
Paula in Maine painted the upper left section and then filled in the shapes with beads ... and then more beads to create radiating patterns.

Included in my package were six postcards from my 100 Lake Series with instructions for each corpse mistress to select one as a thank you for contributing to my piece. The one that came back with the completed corpse is my memory/reminder of the experience for this second round.
One of the postcards from this mini series of eight was an exchange with Susan Lenz and is part of her Cyber Fyber exhibition that opens January 8th. Susan created a blog about the exhibition here.

There is also a blog about all the Exquisite Corpse Textiles from the first round as well as posts about this second one as each corpse is revealed.

Now to get busy and add my finishing touches to this wonderful piece.
.....................
UPDATE - "Sun Mask" finished 2015

Sun Mask - 26"x 21"

Many more beads were added to fill in empty spaces. This helped to unify the sections. A red yarn is couched around the face and orange "leather" triangle pieces were added to many of rays surround the face. The border is made of colored wool roving and sparkling metallic thread under tulle netting. It's all held together with quilting in a pattern of rays extending from the center mask piece. A very "hairy" black yarn is couched over the join between the mask section and the border panel.

This piece was exhibited in the 2015 Smoky Mountain Quilt Guild Show in Maryville, Tennessee.


Wednesday, December 24, 2008

Exquisite Corpse Round 2 - Carol's Piece

Throughout this past year I've participated in a second round of Exquisite Corpse making, Go here to read the premise and beginnings of our project. This one belongs to Carol Taylor of Wales.
The design that Carol drew was based loosely on a Celtic swirl, but included diamonds and dots too.
She had enclosed pieces of brown silk and annealed copper mesh plus a request that aqua be included among our color choices.
Here is my contribution to Carol's Celtic banner.
I laid the bits of silk and deconstructed metallic threads and yarn as well as roving over the background of the square. The shapes were traced from her drawing on freezer paper over a light table and cut out of silk fabrics. The whole section is constructed in my "ortwork" technique, which is a form of collage. The pieces are placed and layered and then "trapped" under tulle netting. Machine quilting holds everything in place. I finished by couching metallic cording over the edges of the shapes as well as outlining the diamond shapes at the top of my square.

My finished corpse was waiting, still in its sealed envelope, for me to get Carol's finished and to the post office. It was difficult not to rip into mine until my obligation to the group project was fulfilled. Soon I'll post about my piece.

Arlee, the originator and "Grand Corpse Vizieress", is gathering another group of corpse mistresses for a 3rd round. The deadline for participation is January 15th. Go to Arlee's blog to leave a comment or find her email address if you have interest in "playing" in this international project.

Go to the Exquisite Corpse blog to see photos and read about the creative processes of all the corpse mistresses as they reveal their corpses as well as talk about the sections they've created on others.

Sunday, December 14, 2008

Ho! Ho! Hee! Hee! Ho! Ho!

I've just celebrated the holidays with my friends in Milwaukee. All of them are of "certain age" and appreciated the humor of these gag gifts. Of course, they each got something else of a more serious nature that was created in my studio. But I sure had a giggle making these.

These slippers are:
* Soft and Hygienic
* Non-slip grip strips on the soles
* Built in deodorant feature keeps feet smelling fresh
* No more bending o ver to mop up spills
* Disposable and biodegradable
* Environmentally safe


The inspiration for these came in a forwarded email from one of my friends. It went like this:

Somewhat embarrassing to admit, Christmas is tight this year.
I will be making bedroom slippers for you
all as gifts. Please let me know your sizes. You'll most likely agree
that it's a splendid idea, and should you wish to do the same, I've
included the instructions below.

How to make bedroom slippers :
You need four maxi pads to make a pair.
Two of them get laid out flat, for the foot part.
The other two wrap around the toe area to form the top.
Tape or glue each side of the top pieces to the bottom of the foot part.

Decorate the tops with whatever you desire, silk flowers (this is most
aesthetically appealing), etc.

Of course, these are a pass it along it your friend kind of gift. I wonder how many times each pair will be regifted.

Nandina Berries in the House

After writing the post last night about the swags and garland made with the evergreens and berries, I just had to bring sprigs of those berries in the house for a bit of holiday cheer. Adding a piece of ribbon from the wrapping box and two flower ornaments make a cheery setting.
This opening is above my kitchen sink. It's as good as having a window since it lets in natural light from ,as well as the view of our courtyard entry. There is always a bouquet of whatever is in season on this shelf. After the first of the year it may be nosegay bouquets of pansies or even a few floating in that art glass piece. The plum fairy mixing a bowl of something sugary is in permanent residence ... usually sitting on that blue cow. Last year she shared this space with geriatric Elvis and friends.

Friday, December 12, 2008

Decorating For Christmas

The extent of decorations for Christmas at our house is limited to outside this year since we celebrate the holidays up north with our children's families leaving well before the 25th and coming back after the new year. Also, it's my gift to our immediate neighbors.
I collected holly boughs and evergreen branches from trees on the extensive property owned by the condo association on our morning walks. Magnolia leaves from the tree plus bunches of Nandina berries and branches of red leaves from the shrubs in our yard accent the five holiday swags I constructed to hang between the garage doors in our pod of condos.
I love those Nandina bushes dripping with berries all winter long. In fact I'm fascinated by the abundance of shrubs and trees that stay green through the winter here in Tennessee.
A couple of buildings have stands of Nandinas between the garage doors that began as transplanted seedlings from those in our yard.

The rest of the greenery became a garland for this iron gate. It's my present for a friend who's also a neighbor, but lives in a different set of buildings. She never knows when, or if, I'm going to do this. She either finds me fiddling around at her entrance or discovers it when she comes home.
I stuck the leftovers in this pot located in the walkway leading to her gate.
I've found that branches placed in pots of soil will last until about Valentine's Day in this climate. I call them winter bouquets.

Two More Birds

One made by me as a Christmas present for a friend. It's similar to one I made for another friend this past summer.
And a second bird made by Kay Susan in England. Go here to see more photos and read the delightful tale that involves this "Rockin' Robin".
There's just one more little bird that I have yet to make before I fly north for the holidays on Monday.

Tuesday, December 09, 2008

Shared Goodies

This fabulous postcard is a Pay It Forward gift from Karoda.
Can you believe it traveled through the postal system? ... and arrived in perfect condition.
This exquisite little cheeper is created by Kay Susan in England.
This is her 'S'Mockeryfied' version created from my bird pattern.Its body is made of her complex cloth and decorated with stitchery. She even wrapped the wire legs with stitching using wool. Go here to read Kay Susan's description of her techniques.
This little beauty is added to the Picasa album of "Birds" along with others shared with me as well as all the ones I've created. That album is now posted in my sidebar. Click the picture of the bird to go there.

December 11th Post Script:
Susan Kay has made yet another bird, "Rockin' Robin". Go here to see him and read the delightful story that accompanies him.

Saturday, December 06, 2008

Dynamic Creating

"A way to minimize the tyranny is to see your art in a state of adjustment and creative development, rather than trying to fulfill some preconceived vision. I call it 'dynamic painting' and it's quite magical. It could be called "dynamic writing" or even 'dynamic living'."

That is a quote from a Robert Genn's newsletter. It came earlier this week just before I conducted a day-long workshop on Thursday sharing my method of creating art quilts from scraps. I hadn't realized there was a name for how I work. I think of it as having a dialog with the piece, or even just playing. At any rate, sharing the way I create was my primary goal.

I was pleased how each participant "got" the dynamic way of creating ... choosing one scrap from the pile in the middle of the table that caught their eye and building a piece around it ... they all played like 6-year olds. No one seemed to notice the cold, rainy, dreary day outside.
I hadn't taught a workshop in so long, there was trepidation about getting into the "flow". However, that interaction with students and responding to situations as they come up was still there without missing any steps in my lesson plan ... whew! The one decision I was a bit worried about was that instead of my demonstrating on my own machine, I walked several students through the featured process on their machines with the others looking on. It worked! The machine owner could ask questions or verbalize during my instruction which helped her and everyone else to really "get it" ... another whew!
In the photo above Martha is going through the steps to determine settings and adjustments for using Bottom Line thread on a prewound disposable bobbin. I suspect there are a few converts to this product available from Superior Threads. BL thread is a fine thread which requires a change in the bobbin case tension ... something many consider to be a NO-NO. Also, bobbin cases vary in depth which means that one or both cardboard sides may have to be discarded so the bobbin rotates freely in the case. Go here (Superior's education site) to learn more about bobbin tension adjustments and prewound bobbins.

Also, introduced was the use of Superiors Polyester monofilament invisible thread as the top thread in machine quilting. It's soft and heat resistant and comes in Clear and Smoke. I use it when I don't want an obvious quilting thread or color to be a design element in a quilt. Often, just a quilting pattern works best with complex and detailed small compositions. The main trick for working with monofilament is lowering the top tension to "0" ... or nearly so. Also, the thread is straight wound onto the spool as opposed to a criss-cross wind, thus it's meant to feed off the spool on an upright spindle. Care must be taken that the thread doesn't reel off the spool too fast or freely.

Here's a series of photos from beginning to end for Carol's piece, one of the ladies who had never dreamed of working this way.
She had brought big scraps of that jungle print. She did a good job of snipping it into bits and rearranging it all.Carol played with a lot of different blues for the sky and created her own wind blown garden.Another feature of this workshop was learning my tricks to couch yarn as an edge finish as well as a surface decoration. The instruction sheet was taken from the tutorial I posted here.

Here's Patty happily sharing her creation at the end of the day.
I'm grateful to Patty for taking and sharing these photos PLUS those in this album I've posted on Picasa. Go there to see the progression of many pieces created dynamically by those twenty quilters as well as classroom scenes thoughout the day.

PS: To read good thoughts and reasons for using Bottom Line thread for machine quilting go to Kathy Yorks blog and scroll down to her post for November 22, 2009.

Sunday, November 30, 2008

SOLD!

Woo Hoo! Each time a piece of my art sells I feel great excitement that someone has appreciation enough to spend their money on it ... especially in this economy.

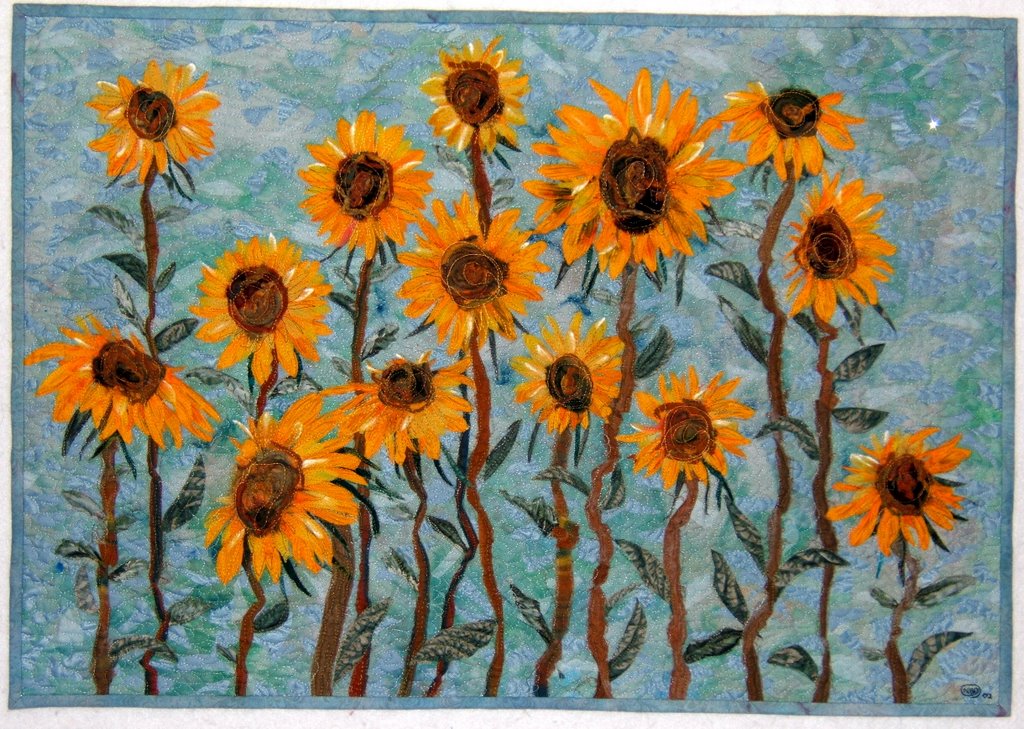
Vincent's Flowers - 33"x23" - 2002
As I've stated in my sidebar, I don't make art or quilts to sell, but I do sell ... meaning I create whatever pleases me rather than what either I or a gallery owner/curator thinks will appeal to buyers. I realize how fortunate I am not to have to make a living from my creations ... that I have the freedom to go my own way.

This piece sold from the Cliffdweller's Gallery on Glades Road in Gatlinburg, Tennessee. It, along with nine other quilts, have been there since my weekend in the mountains a few weeks ago. One of the owners knew of my work and requested that I bring quilts to present to her other five partners. All of them enthusiastically accepted my art quilts to exhibit and sell in their gallery.

It pleases me that there are no rolled up quilts stashed away in my closets (except for the one that alternates on the wall in my living room with the other one I cannot bear to part with). All my creations are hanging in galleries in Tennessee, Michigan, and Illinois. Woo Hoo!

To read about my creating "Vincent's Flowers" go here.

Sunday, November 23, 2008

Little Leather Birds

This pair of small birds is made from leather.
Their head dresses are real feathers. The little ones are molted from the bird who lives next door. The long maroon one was shed from an art sculpture of a lady wearing a feathered hat. Their wings are lined with fabric that is printed with metalic gold.
The male is more colorful with teal on his under tail. Hers is just gold.
They were cut from an artist made leather neck piece. This hand-painted beauty was passed on to me by my friend, Alicia. If you click on the photo you'll see the drawn pattern pieces and that there will hardly be any leftover scraps.
Regrettably, neither of us looked good wearing it. She is getting it back to enjoy it in the form of these birds who will live in the Moroccan bird cage that hangs in her dining room. Shhhhhhh...it's her Christmas present.

A note about machine sewing leather:

  • Use a leather OR very fine needle
  • Lightly sprinkle talcum on the leather so it won't drag against the bed of the machine.
  • Sew with a long stitch so the leather won't tear along the seam. (the head dress feathers are slipped between stitches and secured with a drop of glue)

Kristin who left a comment on my last post sent a photo of her fun bird.
I especially like her positioning the eye in the center of the flower. I hadn't thought of making a black beak.