Nellie"s Needles

Friday, December 22, 2006

Christmas Mice

Making these chocolate mice has become a Christmas tradition for my grandson, Jennings, and me.
The process is a deliciously chocolate mess. They are double dipped.
We end up with whole nest of mice. Also, small nests of two to six mice get put together and delivered to special people.
These mice are chocolate dipped marachino cherries with chocolate kiss heads and slivered almond ears. Their eyes are a black gel frosting that comes in a small tube (purchased in the grocery store). They're fun and easy to make. The challenge is finding cherries with stems. If you're tempted to add these cuties to your holiday treats, be sure to drain and dry the cherries before dipping. Also, use a tempered chocolate (candy bars or chocolate meant for this purose) rather than chocolate chips so they don't end up spotted white.

I wish all of you a happy and peaceful holiday.

All photos are clickable for you to view a larger version in a separate window. Click the back arrow icon of your server to get back to this post. The highlighted text is also clickable to take you to the link or posting that is being referenced.

Wednesday, December 20, 2006

"Turning Leaf" Shoe

All the fabrics I used for this shoe are designed by Jane Sassaman.
Jane's polka dotted fabrics are a big favorite of mine. The shoe is one piece of the blue/green one. I fussy-cut leaves that are from a couple of different fabrics. They were dissected to fit the curves and fill the spaces of the shoe.

The labels for the boxes are free-motion embroidery. I wrote out the words on tracing paper just the way I wanted them to appear. I then sprayed a temporary adhesive to the "right" side of the paper.
I adhered the paper to the wrong side of a heavy satin fabric with the "wrong" side of the writing face up. A heavy thread was wound on the bobbin and a fine one was threaded on top through the needle. I free-motion stitched over the written words.
The stitching perforates the paper making it easy to tear away when the embroidery is complete.

I devised this method through much experimenting. Any style of writing can easily be reproduced. The ease of stitching with the heavy thread in the bobbin as apposed to its being the top thread makes very legible letters.

All photos are clickable for you to view a larger version in a separate window. Click the back arrow icon of your server to get back to this post. The highlighted text is also clickable to take you to the link or posting that is being referenced.

Tuesday, December 12, 2006

"Vamp" Shoe

A friend had given me a "skin colored" fabric with a variety of hand-painted faces ... both men's and women's. I believe it was intended for making dolls. This vamp's face didn't get placed on the vamp of the shoe. It just wouldn't have shown up on that upper front part, although there certainly would've been space for it on a real shoe.
Pictured above is the newly constructed shoe and box. Below is the quilted square.
The fabric for the box is a striped commercial fabric that I had painted. I don't recall if I had intentionally applied the paint that way, or if I had used the fabric to clean up excess paint from something else. At any rate, I love my "paint rags".

All photos are clickable for you to view a larger version in a separate window. Click the back arrow icon of your server to get back to this post. The highlighted text is also clickable to take you to the link or posting that is being referenced.

Monday, December 11, 2006

Making the Shoes

This little 4"x6" book is the inspiration for the shoes featured in "Imelda's Dream" as well as a number of small wall quilts. The sticky notes mark the ones that were favorites.
This is the Christian Louboutin shoe that especially intriqued me. Its silhouette is the ideal for a pump in my opinion. There is a classic elegance to this one. The curve of the heel is so graceful and sensuous. This pump looks like it would hug the foot so it would feel like it belonged there. Oh, I wish I could wear this one. Well, maybe not. I would never spend the money to buy it. Louboutin shoes are mega $$$$$.
So, instead I had a fun time dreaming up variations of my own. Many of them have already been posted. Making these shoes was like eating peanuts. As each one was created it got pinned to my design wall. I hadn't a clue how they were going to be used at that time.
To make a pattern I scaled up the picture from 5"s to 8"s. I did this by tracing the picture in the book and then drawing a grid over it. I then drew an enlarged grid on another piece of paper and drew the shoe within it, duplicating the smaller drawing in relation to the grid.
The drawn pattern was refined and transferred to the paper side of freezer paper. I cut this last drawing apart into the structual elements of the shoe. This gave me the option to play with the pieces to create a great variety of shoes from just this one pattern. Some have a different fabric for each separate piece while others have several paper pattern pieces combined to make one part of the shoe.
The pattern pieces were ironed to the front side of fabric. Then I cut out the pieces leaving an 1/8" edge on the sides where "allow"(ance) is written. Phooey, I see that I got the upper foot (vamp) pattern piece upside down in the photo. The fabric pieces were put together while the freezer paper pattern was still attached. Tiny dots of glue were applied to the "allow" edge. It was easy to align the matching piece. I waited to remove the freezer paper until after the glue dried. A new pattern needs to be cut when the wax wears off the freezer paper ... after about six shoes. That was when I decided to flip the drawing to reverse the direction of the shoe.
I drew a box on freezer paper that a pair of shoes in the size I made would fit inside. It was cut apart on the lines and constructed in the same technique that was used to make the shoes.

Stay tuned for more construction techniques for this quilt, as well as the shoes that haven't been featured in a posting yet.

All photos are clickable for you to view a larger version in a separate window. Click the back arrow icon of your server to get back to this post. The highlighted text is also clickable to take you to the link or posting that is being referenced.

Saturday, December 09, 2006

"Ebony & Ivory" Shoe

Another black and white graphic ... with a red sole. Mmmm, where would one wear this shoe?
The key board is contructed with silk satin fabric. The ribbon is a dimensional bow. Musical note sequins decorate the box lid.

All photos are clickable for you to view a larger version in a separate window. Click the back arrow icon of your server to get back to this post. The highlighted text is also clickable to take you to the link or posting that is being referenced.

Friday, December 08, 2006

"Dicey" Shoe

Who wouldn't feel a bit dicey wearing these heels. Viva Las Vegas!I love black and white graphics with red thrown in.

All photos are clickable for you to view a larger version in a separate window. Click the back arrow icon of your server to get back to this post. The highlighted text is also clickable to take you to the link or posting that is being referenced.

Thursday, December 07, 2006

"Winged Foot" Shoe

Anyone could "dance like a butterfly" in these shoes.
The three printed fabrics are metalic. To carry through the glitz, I added glitter glue colors to the butterflies. Star sequins decorate the box lid.

To see the quilt in which this block belongs go to "Imelda's Dream".

All photos are clickable for you to view a larger version in a separate window. Click the back arrow icon of your server to get back to this post. The highlighted text is also clickable to take you to the link or posting that is being referenced.

Wednesday, December 06, 2006

The "Bearfoot" Shoe

The theme for this shoe is based on a personal experience I had with a black bear a few summers ago.

The Bear Facts
There was great excitement when we saw a black bear 25 feet from our cabin early one morning. Also, it was thrilling to discover a cub's paw prints in the mud on another morning. But it was downright bone chilling to chase a bear out of our cabin.

That unforgettable day my husband had gone horseback riding while I stayed at our cabin to leisurely do some stitching and reading. I had been quilting out by the river all morning until it clouded over and turned chilly. So, I went into the bedroom to read, while waiting for Lee to return.

About 1:00, I thought I heard him on the porch, and he was obviously having a problem with the screendoor. I finished my paragraph and got up to help him. As I came into the livng room, the bear, walking upright, came through the door! We were 6 feet apart, and eye to eye. Without hesitation, I raised both arms and yelled, "WHAT ARE YOU DOING IN HERE? GET OUT!" He turned and stumbled out of the door. Just then two young women drove across the bridge, and saw the bear on the porch with the screen door wide open. They drove up honking the horn to scare the bear up the mountain.

Lee arrived 20 minutes later. He wanted to take me out for lunch and BIG glass of wine to calm me down, but I was okay about it all. However, I didn't sleep too well the next couple of nights imagining alternate scenarios. What if I'd walked in on that hungry bear tearing up the kitchen? What if I were still in the bedroom when he entered? What if ...? I became well-known in Estes Park, and am now called the "Bear Lady". (Lee says if I had just stepped out of the shower, I'd be famous as the "Bare Bear Lady.")

Thankfully, I've not had another personal encounter since, even though bears have been spotted in the area every summer since then. Needless to say, I no longer keep a fruit bowl on the table just inside the door. That screen door gets latched when we're inside and the door gets pulled shut when we're not.

All photos are clickable for you to view a larger version in a separate window. Click the back arrow icon of your server to get back to this post. The highlighted text is also clickable to take you to the link or posting that is being referenced.

Tuesday, December 05, 2006

"Pretty In Pink" Shoe

This is the kind of shoe my mother-in-law, Dottie, would've liked. She would even have worn it at the age of 89.
The flowers are cut from a trim and then clustered under tulle. A metallic cord is couched along the sole. The front edge of the box's top is shaded with an orange oil stick pastel.

All photos are clickable for you to view a larger version in a separate window. Click the back arrow icon of your server to get back to this post. The highlighted text is also clickable to take you to the link or posting that is being referenced.

Monday, December 04, 2006

My Shoes

I too like funky, fun, and pretty shoes but can no longer wear those with much height in the heels.
I did wear a pair of fun new beaded wedge shoes to lunch and a gallery last spring and my back was out for a week. Aargh! They really were comfortable all the while, but by bedtime I could hardly walk.
So, I got these for summer fun.
I also have "art" shoes. These were purchased this way. I have to tie the long laces around my ankle to keep them on.
These were a favorite pair of white leather shoes that became grungy, so I painted them with fabric paints and inks. There's a coating of mink wax on top. This was done several years ago and the paint has never cracked. It hasn't worn off the rubber sole either.
Guess I'll have to dream on with Imelda and just continue going bare/sock footed and don only flat shoes. These are what I wear most often in the winter weather.


All photos are clickable for you to view a larger version in a separate window. Click the back arrow icon of your server to get back to this post. The highlighted text is also clickable to take you to the link or posting that is being referenced.

Sunday, December 03, 2006

"Patchwork" Shoe

NO, I didn't piece all those little squares in the shoe. That part is whole cloth.

Tiny sequins decorate the top of the box. Each sequin was dipped into glue. I used curved tweezers to grasp and place them. There are five tiny stitches through the fabric and tulle around each one to keep them from migrating too far if the glue lets loose.

All photos are clickable for you to view a larger version in a separate window. Click the back arrow icon of your server to get back to this post. The highlighted text is also clickable to take you to the link or posting that is being referenced.

Saturday, December 02, 2006

"Rock'n Roll" Shoes

I live with the "World's Greatest Elvis Fan". So of course I had to make a rock'n roll shoe featuring the King.
My husband tried to talk me out of the one I made for "Imelda's Dream" quilt. He was disappointed that I wouldn't let him have it until he opened his birthday present of this large one made especially for him.

Click on the blue highlighted type to get to my previous postings about Elvis quilts that I've made.

Go to "Elvis Is Coming" to see Lee's Elvismobile and read about an exhibit of "some" of his collection in our local museum that celebrated Elvis's 70th birthday. That was the second museum exhibition featuring Lee's collection. The first was the Historical Museum in Holland, Michigan when it ran a series of exhibitions featuring folk art. Lee makes or embellishes a lot of Elvis stuff. It all has his "tongue in cheek" sense of humor. I'm not a big Elvis fan, but I love my husband's "zaniness" about the whole thing. He calls me his Elvis enabler

All photos are clickable for you to view a larger version in a separate window. Click the back arrow icon of your server to get back to this post. The highlighted text is also clickable to take you to the link or posting that is being referenced.

Friday, December 01, 2006

"FrootLoop" Shoe

First, the vegetable shoe. Now, the fruit shoe.
The berries were all cut from a quarter yard of a fruit printed fabric. There were a lot of berries. Enough to make three shoe quilts. One for "Imelda's Dream", one for Alicia's and my friend, and this one that I donated for our guild to sell at the annual quilt show.

"Fuit Footwear"
The dragon flies and ladybugs nestled among the berries came from a different fabric. I decorated these bugs with glitter glue to make them look like jewels adorning the shoes.

All photos are clickable for you to view a larger version in a separate window. Click the back arrow icon of your server to get back to this post. The highlighted text is also clickable to take you to the link or posting that is being referenced.

Thursday, November 30, 2006

Vegging Out

Initially, this one was titled "Eat Your Veggies".
I couldn't resist playing with the vegetables on a large scale printed fabric for this one. Each of them just fell into place on this shoe. This heel is really spiked. I just couldn't trim away that asparagus tip.

All photos are clickable for you to view a larger version in a separate window. Click the back arrow icon of your server to get back to this post. The highlighted text is also clickable to take you to the link or posting that is being referenced.

Wednesday, November 29, 2006

Beach Ball Shoe

Making shoes began as something fun to do in the studio while my friend, Alicia, was here in Tennessee for a visit. We had decided to make small quilts as Christmas presents for our mutual friends. Both of us made contributions to each of those six quilts. They were much like the boot one that I had made for my sister.

They were such fun that I continued making a bunch more. All were based on the silouette of a shoe designed by Christian Louboutin, a Parisian shoe designer. He paints all the soles of his shoes red.. The first shoe I made that ended up in the large quilt, "Imelda's Dream" was this one.


All photos are clickable for you to view a larger version in a separate window. Click the back arrow icon of your server to get back to this post. The highlighted text is also clickable to take you to the link or posting that is being referenced.

Monday, November 27, 2006

Shoes

Over a period of two years I created a lot of quilted shoes. Each one is as big as an actual size 6 shoe. Most of them went into the quilt, "Imelda's Dream". From now until after the holidays I'll post photos of each of them, including a brief description or pertinent information.

This quilt was a birthday present for my sister in Indiana. It hangs in the room that also has her collection of dolls. The boot is made from a lace dresser scarf and has a silk taffeta under layer and heel. The background and frame are home dec fabrics given to me by my interior decorator friend, Ebbie.

All photos are clickable for you to view a larger version in a separate window. Click the back arrow icon of your server to get back to this post. The highlighted text is also clickable to take you to the link or posting that is being referenced.

Friday, November 24, 2006

"Crinkle Quilts" List/Location in Weblog/Galleries

There is interest in viewing just my "Crinkle Quilt" art pieces. Click on a title to go the posting to see photos and read descriptions. All photos are clickable to view a larger picture. Click on the "back arrow" of your server to get back to a posting after viewing the enlarged version. The list is in the order of when they were created. Enjoy!

"Wild By Design"
"Passing Storm"**
"Burning Tree"***

"In the Spirit of Gee's Bend" Series of 3
"In the Spirit of Gee's Bend"*
"Magic Carpet"
"The Spirit of Africa"**

"Faceted Spectrum"***
"Joyful Noise"
"In the Garden"**
"Reflections II"
"Gemstones"**
"Tumbling Block"**

Sliced Series:
"Circle 'round"***
"Squared Off"*

Technique:
"Wrinkles In My Crinkle Quilts"

* At Good Goods Gallery - Saugatuck, Michigan
**At MB Gallery - 407 N. Elizabeth Street
Chicago, IL
***Sold

list will be updated as postings and changes are made

Thursday, November 23, 2006

Quilting and Press'n Seal

I'm not particularly fond of Press'n Seal in the kitchen, but I like it a lot in my studio. It's transparent and sticks to fabric and leaves no residue. I draw experimental quilt line patterns on its non-porous surface with a fat tipped Sharpie pen.
It is great for experimenting with quilting patterns directly on the quilt top.
I experimented with wavy, diagonal lines drawn across the warm hued patches. This patterning harmoniously mirrored the directional painting I had added to those patches. Also, I liked the subtle, concentric,ogee-like patterns radiating from the center that developed. This looked good, so I machine quilted those lines with a heavy gold thread. But first, I had machine quilted all the straight lines in the ditch with invisible thread.
I used this on the cottage piece that was completed last spring. I couldn't decide if I wanted to quilt the lines to depict the siding on our cottage. But there were good sized spaces with no quilting within the building and it needed something.
So I cut a piece of Press'n Seal to shape and drew lines. In keeping with the wonky perspective and general feel of the piece, I drew wavy rather than straight ones.
I liked it! Even ended up stitching the lines with black thread. Originally, I was thinking they should be stitched with white just to show texture and to fill in those spaces with quilting. However, seeing the black drawn lines changed my mind.
I know some quilters leave the Press'n Seal stuck to the fabric and sew right through it. I tried that once. Getting the Press'n Seal off without messing up the quilting stitches was a problem for me. It's tough stuff!

Another way that I use Press'n Seal is to figure out the drawing of an overall quilting pattern and stick it to foam core board. I prop it up next to my sewing machine as a reference while I quilt.
I had placed the Press'n Seal over a portion of this quilt top and drew quilt patterns within the blocks as well as between and inside the hearts of the border.
To read more about this quilt go to Quilt of the Day.

All photos are clickable for you to view a larger version in a separate window. Click the back arrow icon of your server to get back to this post. The highlighted text is also clickable to take you to the link or posting that is being referenced.

Tuesday, November 14, 2006

Oil Paint Stick Work

I had pieced this several years ago using Ricky Tims "harmonic convergence" technique. It was prepared as the background for one of my African series quilts.
It now feels like the right time to give this piece some attention. I added gold paint to the surface today. It will have a few days to set while we're gone to Memphis.
The bottom of a plastic container was used to make angled lines. I placed the plastic piece under the fabric and rubbed across it with the paint stick to make the lines on the solid, or nearly solid, colored patches. Each quadrant has the same angle of lines in relationship to the center of the quilt.
The bottom of a pressed glass plate was used to rub branch-like shapes on the printed patches. I was very loose in technique because I didn't want the solid, uniform pattern that you see on the plate.
The same glass plate was used to make a sparse pattern of lines within the circles. I then used a bubble patterned piece of cardboard that insulates take-out coffee cups to rub small irregular circles of gold within the circles. My fingers got messy with gold and I couldn't help getting it on the background while maneuvering the fabric over the objects that were used for rubbings. So ... I coated my finger with gold and lightly rubbed it all over the dark areas between the circles. The whole surface shimmers and shines.

Come back next week to see how this piece developes. I can hardly wait to get back to my studio to heat set the paint and get on with the rest of it.

Graceland, here we come!

All photos are clickable for you to view a larger version in a separate window. Click the back arrow icon of your server to get back to this post. The highlighted text is also clickable to take you to the link or posting that is being referenced.

Sunday, November 12, 2006

On A Walk After the Storm

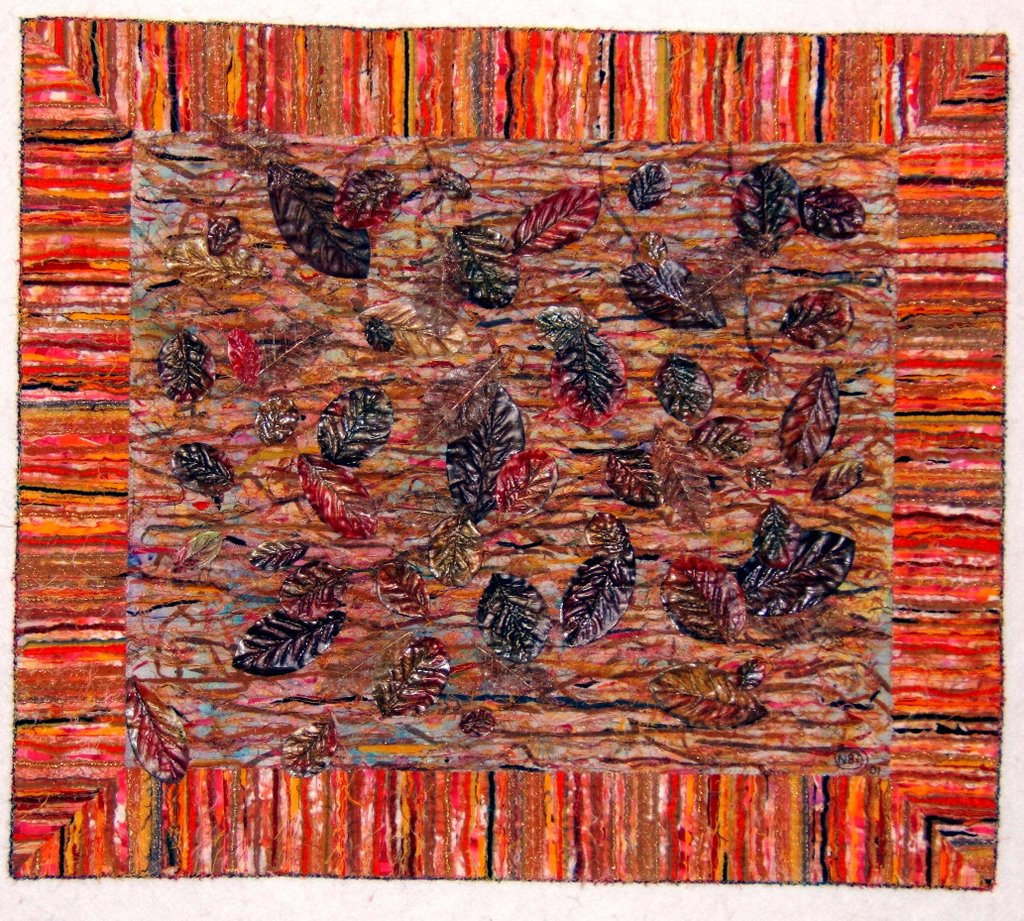
The blue sky is reflected in the wetness between fallen leaves. There is usually sunshine and beauty after a storm.
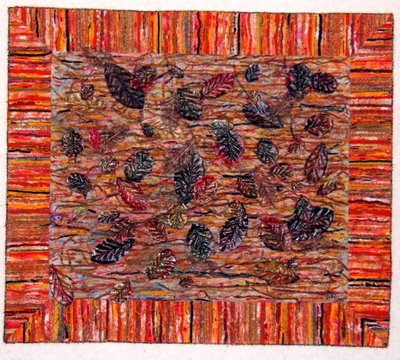
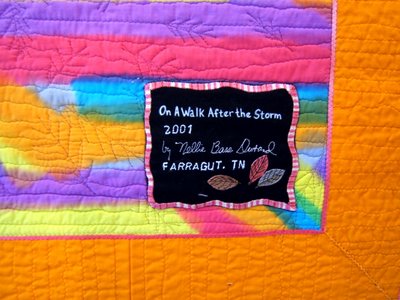
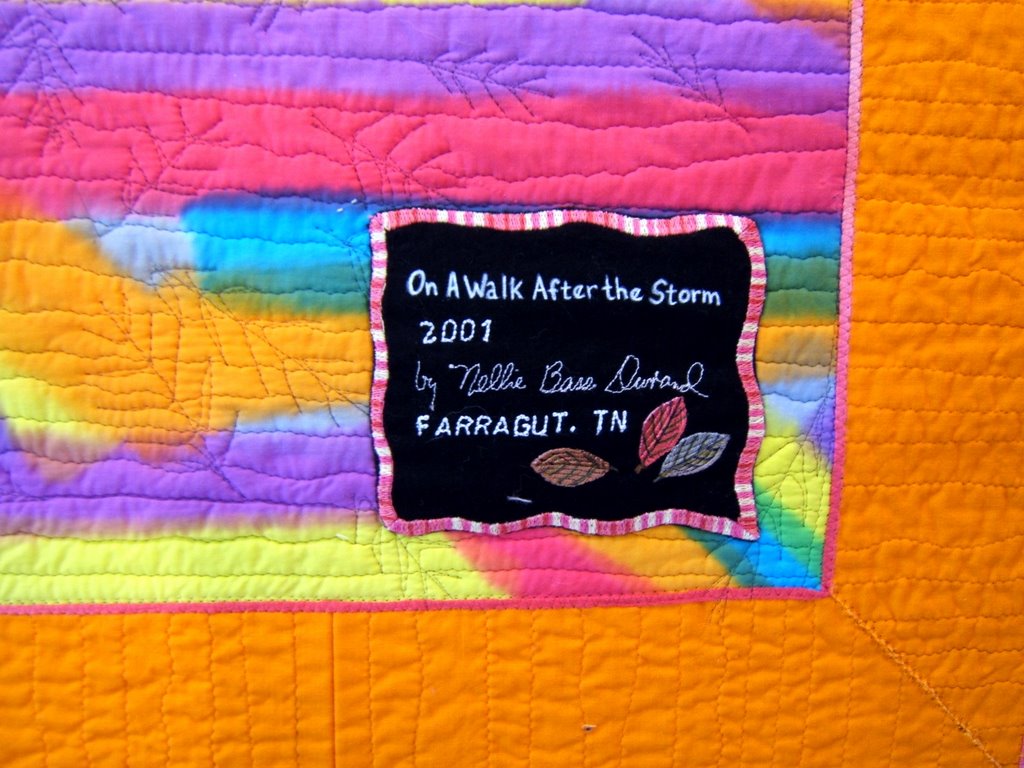
"On A Walk After the Storm"- 28"x24" - 2001
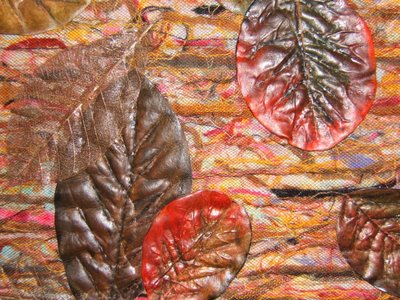
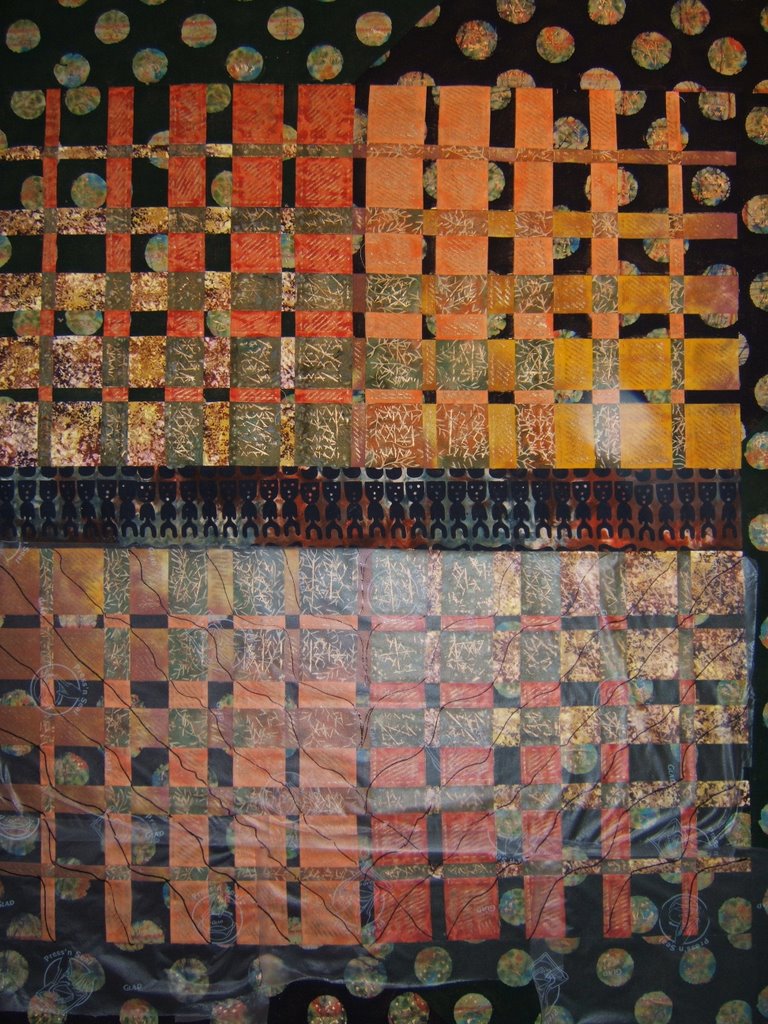
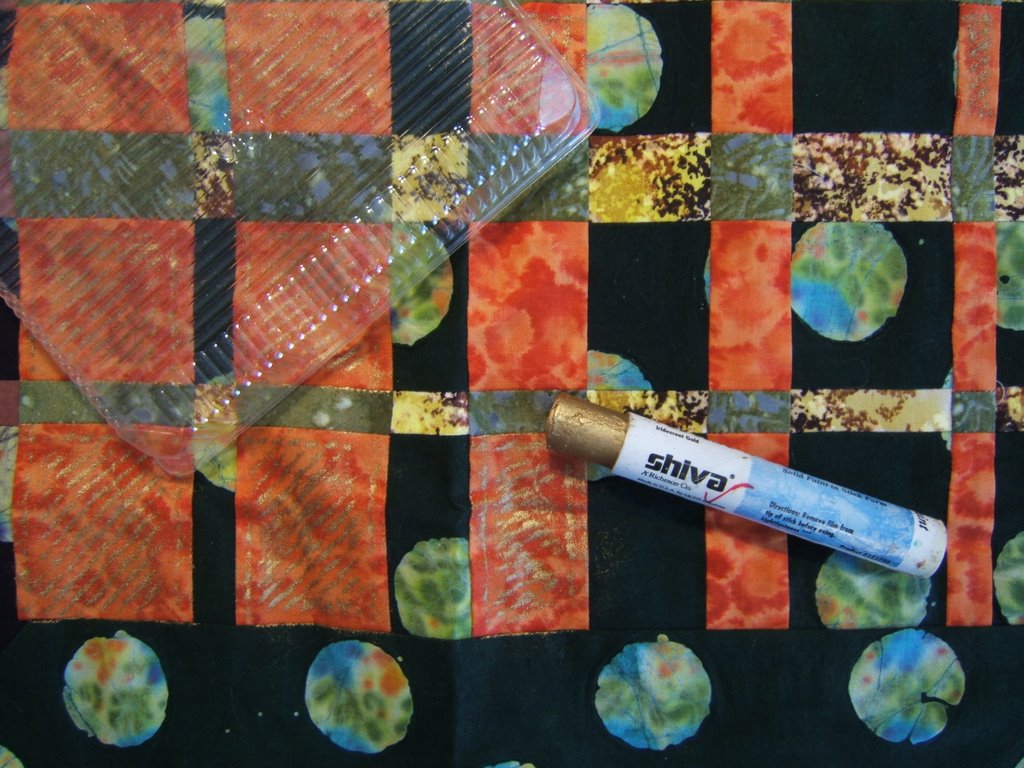
Real leaf skeletons and silk plant leaves are painted and applied with machine stitching that follows their vein lines. The leaves are scattered over a ground of hand-painted fabric that is collaged with the threads and fabrics gathered in the process of making the chenille fabric border.
I use my collage technique that I call "ortwork". It involves arranging bits and pieces of fabric and threads (the British term for these scraps is "orts") over a background that is layered on top of batting and a backing fabric. Tulle netting is laid over the collage to trap the "orts". Machine quilting holds all the layers together. Yarns are couched to the edge with machine zig zag stitches.
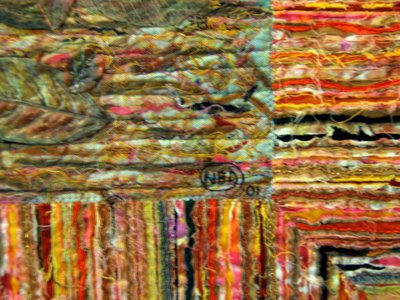
The border is made using a "chenille" technique. Ten layers of fabrics were sewn through at 1/2" intervals. I chose cotton batistes, silks, as well as "quilters" cotton fabrics. Each channel was sliced to a different depth to reveal the raw edges of the sliced layers. Some edges of fabric were trimmed away to better reveal the underlying ones. The cut edges went through multiple times of "roughing up" with a stiff brush and a tumble with tennis balls in the dryer. I ended up with a big pile of orts to use in the center panel.
The borders were created as one large piece and then cut into the four border pieces. Miter cuts were made at each end. All the components have raw edges butted together. Machine zig-zag stitches hold them together. I couched a flat cotton yarn over the join between the center and border pieces on the back side to reinforce the hold as well as to give it a neater finish.

Materials I used are cotton and silk fabrics, metallic & mono-filament threads, yarn, fabric and acrylic paint, leaf skeletons, silk plant leaves, netting, and cotton batting

It received the Innovative Design Award at the 2002 Dogwood Arts Quilt Show & Competition in Knoxville, Tennessee

All photos are clickable for you to view a larger version in a separate window. Click the back arrow icon of your server to get back to this post. The highlighted text is also clickable to take you to the link or posting that is being referenced.