Nellie"s Needles
Showing posts with label Smoky Mountain Quilts. Show all posts

Thursday, April 18, 2013

Quilt Show Winners

I've been delinquent in posting about the Smoky Mountain Quilt Show that took place recently on the Maryville College campus here in east Tennessee recently.

It's a pleasure to report that my three entries were each awarded ribbons.

"Lavender Haze" 31"x 30"
It won 2nd place in the special category for the Smoky Mountain Quilt Guild challenge pieces made for this year's AQS Guild Challenge. If our guild's entry is accepted, you'll see this one exhibited in Grand Rapids next August.


"Smoky Mountain Sunrise" 20"x 16"
It won 3rd place in the Art Quilt category. To see the beginnings of this piece as well as others that present variations of my favorite view in the Smokies go here.


 "Unraveled VII" 24"x 40"

This piece got one of the special award ribbons, the one for Innovative Design (its rosette designed by Tone Haugen-Cogburn). I pretty much knew this piece would be controversial ... and it was. I had entered it in the "Modern Quilt" category because it fit the requirements:

— An interpretative quilt using elements which are simple, yet sophisticated. This hybrid form may include: improvisational techniques; an emphasis on negative space; a minimalist approach; simple shapes, patterns and quilting designs; clear, crisp colors with white or gray neutrals; graphic or large scale prints and/or an abundance of solids; asymmetry.

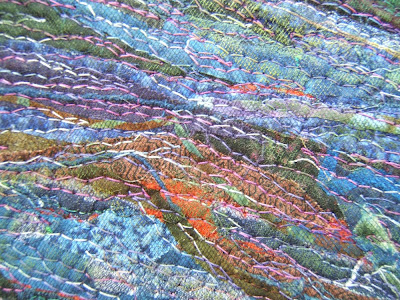
I was aware the texture of this piece was not what the "modern quilt" movement expected. There was doubt expressed by several viewers that this piece was even quilted. Granted it has the look of a woven tapestry piece. However, there's quite a lot of stitching and all of it functions as quilting.


I'm especially pleased with how the length of yellow rick-rack worked in at the top. A piece of the raw silk stripped from the background fabric anchors the rick-rack by being carried across it and stitched back into the base fabric.

To read more about this piece scroll back a few posts. The first post was February 8th.


Monday, July 11, 2011

More About ArtPrize

The announcement of my ArtPrize entry in the last post may have surprised a number of you ... those of you who remembered reading about an earlier pronouncement that this was my 2011 entry. That it was to be another installation piece featuring an early spring morning in the Smoky Mountains.
I got as far as doing weeks of research about the spring growth at a particular altitude, as well as doing two fabric studies besides the paper one above. My decision to abandon that project for now came before this  second one was finished.

The thought of devoting all my time and attention to just one project for a third year. was overwhelming. I decided that what I really wanted was to be available to spend time, as well as to be available to play with my family and friends this summer.

The mountain project is not dead. Although, I think it will be a good idea if it's done as a commission project, as was "Prairie Performance". Especially since "The Lake" is still not sold even though it has received much acclaim. It's presently hanging in Good Goods Gallery in Saugatuck, Michigan. I'm pleased to be able to visit it there, but I'd rather it find a permanent home either in a business or on the walls of a home that does not have the good fortune of having the view I see literally or figuratively of Lake Michigan.

Saturday, March 12, 2011

Mountain Sunrise Study #2

The first fabric study* is complete...

17"x 13"
There's a lot about it that I'm not happy with ... mainly that there's too much pastel work.  Working in this small scale I find it difficult to make the fabric patterns and pieces "read" the way I want them to.  Here's a photo taken of it earlier in the process ...
... before I got out the pastels ... before a lot of the middle and fore ground details were added.

Working through this first one has helped me to more clearly see the range of hues that I need to be gathering from my scrap bags.  I'll again be going through those first two that these bits and pieces came from.

Here are the fabric and paper studies together.

I already see changes I want to make to the composition.  There'll be time for another fabric study before we have house guests next week.


*The paper/pastel study is number one.

Saturday, April 25, 2009

Mountain Quilt Finished

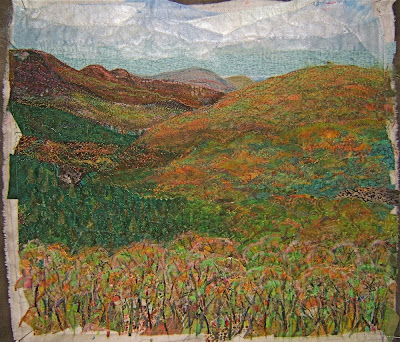
I thought you may like to see the stages to complete this "ortwork" collage piece that features the Smoky Mountains. The background pieces from my scrap bag were laid out to establish the basic placement of the mountains, groves of trees, and sky during the Friday afternoon demonstration at the gallery in Gatlinburg. I had in mind to portray the new growth that I had observed on the drive to the mountains. This step is akin to doing an "under painting".
Friday evening at home I added details with more bits of fabric scraps. There was a lot of cutting with scissors and the rotary blade. Angora yarn and wool roving was used to soften and blend areas.
A pale, muted red-violet tulle was laid over the surface to trap all those bits and pieces in place. Lots of pins held this sandwich of backing, batting, scraps, wool, and tulle together. I used a variety of threads, many of them variegated, to quilt patterns that suited each area of the scene. I like to use the zig-zag stitch setting for free-motion quilting of the trees.
It was then pinned to the design wall. Oil stick pastels were used to highlight and define shapes and edges. This is a slow process. After adding a touch of color or shading I need to leave the room or do something else before I can assess it with a "fresh eye" to see if the addition is convincing. A black permanent ink brush tipped marker was used to add more tree trunks and branches to the grove of trees in the foreground. To set the pastels the piece was sprayed with Krylon's clear acrylic. I use the one that has a UV ray protection to help guard against fading over time.
I squared it up trimming away the unfinished edges. You may recognize the fabric frame from the large mountain piece recently completed. I had intentionally made more than was needed for that piece, just in case I goofed cutting a mitered corner. Sure enough, I did ... and still had enough leftover to frame this one.

"Spring from Morton's Overlook" (2009)
20"x 18"
To see the other four "ortwork" collage pieces featuring this same view click on the Smoky Mountain Quilts lable.

Friday, April 24, 2009

Spring Gallery Gathering in Gatlinburg

Yesterday afternoon at Gatlinburg's "Spring Gallery Gathering" in the Cliff Dweller's Gallery I was one of seven artists demonstrating art. There was weaving, basket making, dulcimer making, pot throwing, marbleizing paper, and mixed media collage going on in the upstairs studios and on the front porch. I was set up in the gallery. My project was creating the base layer for my fifth mountain piece of the same view of the Smoky Mountains from Morton's Overlook.
Visitors were amazed that the one hanging on the wall for the afternoon began this way.
I got to the point of adding the finer details at the end of four hours.
"Silk Roses" along with several of my other quilts are among lots of art hanging on the walls. There are also four birds among the baskets and pottery on the shelves.

Wednesday, April 22, 2009

Smoky Mountain Quilts

This small quilt of the Smoky Mountains is my contribution to Collage Mania 2009 auction. It will be one of 383 quilts donated to this years Fiber Arts For A Cause to raise money for the American Cancer Society. Pre-auction viewing of all the quilts begins April 29th.
It is donated in memory of a friend who loved these mountains.

Tomorrow this quilt along with the large one I made of this same view, "Our Biosphere Reserve", will be displayed at the Cliff Dweller's Gallery in Gatlinburg, Tennessee. I will be there throughout the afternoon demonstrating the collage technique I developed using scraps of fabric.

Wednesday, March 04, 2009

"Our Biosphere Reserve"

This is the result of my "playing" with all those scraps.

Our Biosphere Reserve - 40"x 31"
The Smoky Mountains National Park is designated as an International Biosphere Reserve by the United Nations in observance of the 75th anniversary of the establishment of Great Smoky Mountains National Park in 2009. This international recognition represents the Smokies' importance to the planet. The purpose of this United Nations' program is to recognize and encourage preservation of the world's great cultural and biological areas.

This art piece features my interpretation of the view from "Morton's Overlook". In the spirit of conserving our biosphere's resources this quilt is made from recycled or repurposed materials. The picture part is composed of fabric scrap bits and pieces from previous projects, both mine and other peoples. The foundation structure features an old blanket as the batting and upholstery fabric leftover from a friends project is the backing.

It took concentrated effort to meet the deadline of presenting it at the Smoky Mountain Quilt Guild meeting last night. This was one of twenty-one quilts competing for inclusion in the SMQ Guild's entry for the Ultimate Guild Challenge in the AQS summer show. The theme chosen by our guild for its entry was "Go Green", which was open to interpretation by each participating member. Leah Marcum-Estes, director of the Oak Ridge Art Center, was invited to be the juror to select the eight quilts for this entry. We certainly presented her with a challenge to choose only eight from so many wonderful quilts. I'm pleased my quilt was one of those selected to represent the Smoky Mountain Quilt Guild.

The SMQ Guild has won awards in three previous AQS Ultimate Guild Challenges. To see the quilts for the year we won the Grand Champion Award ($5000) go here. To see my quilt contributions for the other two award winning years go here and here.

Tuesday, March 03, 2009

Busy Quilting and Coloring

For several days I've been machine quilting ...
and coloring in with oil stick pastels to enhance, correct, and highlight various sections of the quilt ...


Monday, March 02, 2009

It Began A Few Days Ago

These four bags full of scraps were dumped on the floor ...
bits and pieces found their way onto this surface ...
and got pinned down ...

Sunday, March 01, 2009

Onto the Next Project

This yarn has transformed ...
this subtly striped upholstery fabric ...
to this richly textured fabric for my next project ...

Sunday, October 05, 2008

Creating Layered Borders

For this Smoky Mountain series I decided to keep the composition small (9"x 9"). To give the pieces substance as well as to emphasize the distance of the furthermost mountains they are framed with 2" wide borders.

Sugarlands Overlook (14"x 14")
These borders are created by laying and couching yarns as well as adding decorative machine stitches to a foundation of fabric. All four borders are constructed in one piece. The surface foundation fabric is layered with batting and a backing fabric. I use a spray adhesive to adhere those three layers so they don't shift while doing all the machine work that lies ahead.
Also apply a spritz of spray adhesive to the top surface of the foundation fabric. Make a selection of decorative yarns that complement the composition. I chose two variegated chenille yarns plus one that is twisted with a finer thread and a decorative rayon one. Cut lengths and arrange them on top of the foundation.
Select a tulle netting that complements your choices and the composition for which the border is being created. I used black. Spritz a layer of adhesive to the underside of the tulle before carefully laying it in place. Pin baste all the layers together.
Machine stitch around the outside edges to secure the yarn ends. Run straight rows of stitching parallel to and between the rows of yarns.
I had used a metalic copper thread for that first set of stitches.
And then I couched rows of this twisted fiber yarn across the piece.
To read the tutorial about the method I use for couching yarn go here. Scroll to the middle of that post for the instructions to couch yarn on a surface. The first part is about couching yarn to raw edges.
This is the result of couching that variegated twisted linen type yarn.
My last step was to fill in any spaces with rows of a narrow zig-zag pattern using a #40 quilting thread.
When you are satisfied with the amount of stitching trim one ragged edge from the layered border fabric. Measuring from this clean edge cut the fabric into four borders. For this small composition each of the borders are the same width. On some of my larger quilts the bottom border has been cut wider than the other three.
Do not cut any length away from the borders. Align the edge of a border with the edge of the quilt. Apply scotch tape to keep the pieces together. Turn it right side up and stitch the two together with a wide zig-zag stitch.
Apply the border on the opposite side of the quilt. Then zig-zag stitch the other two borders just to the sides of the quilt. All the corners will be overlapped and hanging loose.
My preference is to miter the corners of these borders. Although, they certainly could be finished otherwise. Use an acrylic ruler to draw the angle between the corner of the quilt and where the edge of two borders meet. For equal width borders this will be 45 degree line. It will be a different angle for two borders that are different widths. Cut along this line through both layers. It's easier to cut one layer and then draw on and cut the other. Tape and zig-zag stitch the miter closed.
To finish the raw seam between the borders and the quilt I cover it with a flat decorative yarn. It is zig-zag stitched in place by machine. Do this before applying decorative yarns to those same seams on the front of the quilt.
Here's a close-up photo of the decorative yarns that finish the front side of the quilt. Use the first method described in my tutorial for couching yarns to apply it to the outside edge. Sometimes I cover the mitered corner seams with yarn. Doing so will draw attention to that detail. Omit that step if doesn't work for your quilt.
Here are links to other quilts that feature my layered fabric borders:

Monday, September 29, 2008

Couldn't Leave It Alone

I got the borders made and sewn on the third Smoky Mountain piece (there will be a tutorial about this process coming up soon). It was on my design wall for a few days hanging with the first two along with my reference photo. While sorting the heap of scraps on my studio floor into separate bags ... one for lake quilts, another for future mountain pieces, plus a pile of the larger pieces for scrap blocks to make charity quilts ...I studied and compared.
I couldn't leave it alone! Each day I was less enamored with just letting the fabric tell the whole story. Compared to the first two versions it was looking like a "paint by number" piece.

Sugarlands Overlook (14"x 14")
I just had to get out the oil stick pastels and watercolor pencils to shade hard edges and add fall colors to the trees in the mountains. Who knows? I may not be finished with touching it up yet.

I feel a need to get into the Smoky Mountains before continuing this series, which will happen in less than a month. In the meantime, it will be back to creating lake quilts while I'm living on the shore of my subject. Between pieces I'll continue to make blocks from the pile of larger scraps